Build a Client Onboarding System That Runs Itself
Stop emailing intake forms back and forth. Here's how to set up an automated onboarding pipeline that books, collects, and prepares every new client without you lifting a finger.


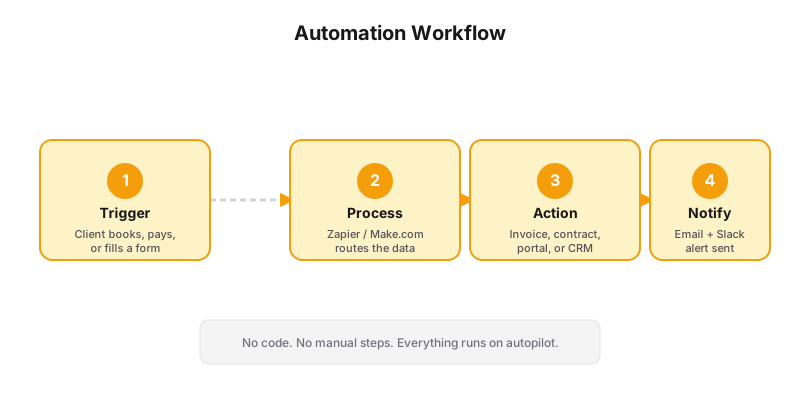
You just wrapped a discovery call with a perfect-fit client. They’re ready to sign. Now begins the scramble: you email them a contract, wait three days for them to sign it, send a Stripe invoice, chase them for payment, forward a calendar invite, attach the intake form in a separate email, and paste the Zoom link into a follow-up message.
This handoff — from “yes, let’s work together” to “first session booked” — is where most coaches leak time and revenue. A clunky onboarding experience also costs you clients. If it takes a week to get them onboarded, their momentum dies.
Here’s how to build an onboarding system that processes a new client in under 5 minutes of your time.
The Four Pieces of Onboarding
Every coaching onboarding breaks down into four steps:
- Contract — Terms, scope, and legal agreement
- Payment — Deposit, full fee, or payment plan
- Intake — Goals, history, availability, health/waiver info
- Scheduling — First session booking + prep materials
The goal is to move a client through all four steps in a single workflow — without you emailing anything manually.
Step 1: Digital Contracts
HelloSign (now Dropbox Sign) is the easiest way to send contracts that actually get signed. The free tier lets you send 3 signatures per month. The Essentials plan ($15/month) removes that cap and adds templates.
PandaDoc is more powerful if you need payment collection embedded in the contract, automatic reminders, and expiry dates. The Individual plan ($19/month) covers most solo coaches.
Bonsai is coaching- and freelancer-specific. It includes contracts, proposals, invoicing, and time tracking in one tool. The Workflow plan ($25/month) includes automated contract reminders.
Pro tip: Set your contracts to auto-remind after 48 hours and expire after 7 days. Clients who don’t sign within a week rarely become good clients.
Step 2: Payment Collection
Your contract and payment should be in the same flow. If a client signs but doesn’t pay, you’re still chasing them.
Stripe is the gold standard. Create a one-time payment link or invoice and embed it in the contract. Set up automatic receipt emails so clients get a paid confirmation without you sending it.
Square is better if you also take in-person payments at workshops or events. The invoicing is simpler but less customizable.
Generativity Media’s Launch plan includes Stripe integration built into your website, so contract-to-payment happens on your domain — not through a third-party portal.
Step 3: Automated Intake Forms
Don’t send intake forms as PDF attachments. Use a tool that captures data and stores it.
JotForm — The most flexible form builder. The Bronze plan ($39/month) lets you create multi-page forms with conditional logic (show different questions based on goals, experience level, etc.) and automatic email responses.
Typeform — Better design, worse data handling. The Basic plan ($29/month) is fine for simple intake. Best for coaches who prioritize brand experience.
Calendly (Standard plan, $12/month) — If you embed intake questions into the booking flow, you capture the information before they book. This is the simplest approach.
The key is that intake data flows automatically into your client management system — not into a PDF in your downloads folder that you’ll need to manually transfer.
Step 4: First Session Scheduling
The moment payment clears, the client should be able to book their first session. This means your scheduling tool needs to integrate with your payment processor.
Acuity Scheduling has this wired natively. You can set rules like: “Only show available appointments after payment is confirmed.” The Emerging plan ($16/month) does this.
With a Generativity Media site, this entire pipeline is a single flow on your website. Client clicks “Book Now,” signs the contract, pays, fills intake, and picks their first session time — all on your domain, all in one go, all automated.
The Fully Automated Onboarding Flow
Here’s what it looks like when all four pieces connect:
- Client clicks “Get Started” on your website
- They review and sign the contract (HelloSign or PandaDoc, embedded on your site)
- They enter payment info (Stripe, processed before anything else happens)
- They fill out an intake form (JotForm or Typeform, with conditional logic)
- They book their first session (Calendly or Acuity, showing only available slots)
- They receive a confirmation email with calendar invite, Zoom link, prep worksheet, and what to expect
- You get a notification — “New client onboarded” — with a link to their intake data and payment receipt
Total time you spend: Zero. Total time the client spends: About 8 minutes.
| Step | Tool | Automation | Time Saved |
|---|---|---|---|
| Discovery call booking | Calendly | Auto-rules + reminders | 2 hrs/wk |
| Contract signing | Honeybook / Dubsado | Template + e-sign | 1 hr/wk |
| Payment processing | Stripe | Invoice + auto-receipt | 1 hr/wk |
| Intake form | Typeform / Google Forms | Conditional logic | 30 min/wk |
| Portal access | Notion / Custom | Auto-generated link | 1 hr/wk |
| Welcome email | ConvertKit | Triggered sequence | 30 min/wk |
What Most Coaches Get Wrong
The most common mistake is treating onboarding as a checklist you manage rather than a pipeline you design. You email the contract, wait, email the invoice, wait, email the form, wait. Each “wait” is a place where the client loses momentum or you forget to follow up.
The fix is always the same: automate the handoff between each step. Contract signed → trigger payment link. Payment confirmed → trigger intake form. Intake submitted → trigger booking link. Booking made → trigger confirmation email.
Most modern tools (Calendly, Stripe, JotForm, Zapier) have these integrations built in. You set them up once and they run forever.
When to Upgrade to a Custom System
The DIY approach above works well up to about 10-15 active clients. Beyond that, you’ll feel the friction of client data living in six different tools.
A Grow plan site consolidates everything into one system. Onboarding, payment processing, content delivery, and scheduling all live on your domain. You don’t manage six logins. Your clients don’t get redirected to six different tools.
The pipeline gets them in the door. Discovery sold the hour. Progress notes are the questions after.
Want a tour of what this looks like in practice? Let’s talk.